Sketch作为一款广受欢迎的矢量图形设计工具,其功能远不止基础的矢量设计,它的真正实力部分源自其丰富的插件生态系统。Sketch向开发者提供了官方的第三方插件接口,这使得整个社区能够创建和分享众多功能各异的插件,极大地拓展了Sketch的核心功能集。用户可以便捷地探索数百种精心设计的插件,以契合个人工作流的独特需求,并能够简单快捷地获取和安装这些插件。
尤其值得一提的是,Sketch采用JavaScript API作为插件开发的主要手段,这一机制允许开发者利用JavaScript编写插件代码,借助CocoaScript桥梁与Sketch的内部API以及macOS框架无缝对接。因此,即便是熟悉Web前端技术的开发者也能相对轻松地涉足Sketch插件开发领域,创造出更多提升设计效率和功能性的插件解决方案。
一、Sketch插件可以做什么?
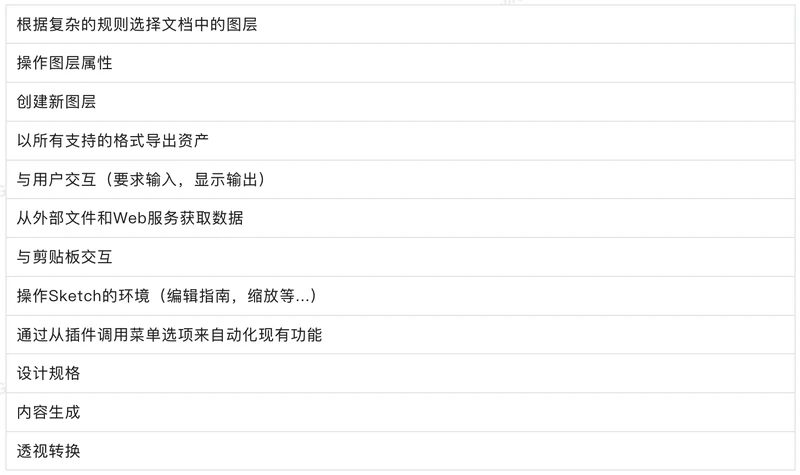
Sketch中的插件可以做任何用户可以做的事情(甚至更多)。例如:
二、插件简介
Sketch 插件都是 *.sketchplugin 的形式,其实就是一个文件夹,通过右键显示包内容,可以看到最普通的内部结构式是这样的:

manifest.json用来声明插件配置信息,commands 定义所有可执行命令,每条 command 有唯一标志符,identifier,menu 定义插件菜单,通过 identifier 关联到执行命令。
my-commond.js是插件逻辑的实现代码实现文件。
三、Javascript API for Sketch
这是Sketch的原型Javascript API。 原生Javascript,Sketch的完整内部结构的一个易于理解的子集。它仍然是一项正在进行中的工作。
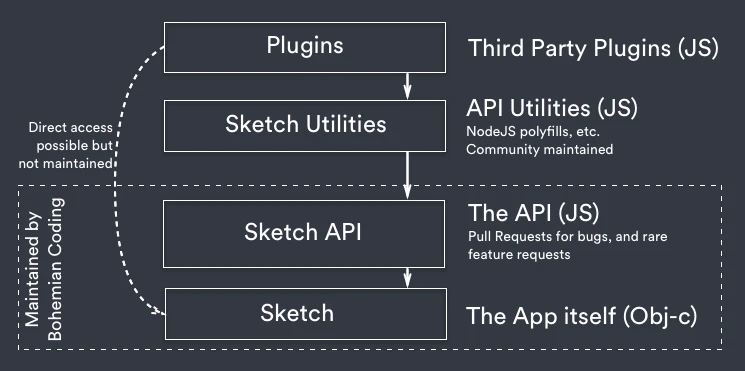
Javascript API for Sketch 原理:
四、开发文档
1、开发文档
Sketch Developer — Build something beautiful
2、API
Sketch Developer — API Reference
3、Action API
Redirecting…
Sketch Developer — Actions Reference
4、Sketch Source
SketchAPI/Source at develop · sketch-hq/SketchAPI · GitHub
5、Demo
SketchAPI/examples at develop · sketch-hq/SketchAPI · GitHub
五、Sketch webView
Sketch模块,用于使用webview创建复杂的UI。有别于一般的插件页面,可以使用webview模块加载一个复杂的Web应用,使其与Sketch进行交互。
1、BrowserWindow
在浏览器窗口中创建和控制Sketch:
// In the plugin.
const BrowserWindow = require('sketch-module-web-view');
const identifier = "identifier";//webview 标识
let win = new BrowserWindow({identifier, width: 800, height: 600, alwaysOnTop: true})
win.on('closed', () => {
  win = null
})
// Load a remote URL
win.loadURL('https://github.com')
// Or load a local HTML file
win.loadURL(require('./index.html'))
2、获取已存在的BrowserWindow
import { getWebview } from 'sketch-module-web-view/remote';
const = identifier = "identifier";
const existingWebview = getWebview(identifier);
if (existingWebview) {
  if (existingWebview.isVisible()) {
  // close the devtool if it's open
    existingWebview.close()
  }
}
3、webContents
const BrowserWindow = require('sketch-module-web-view')
let win = new BrowserWindow({ width: 800, height: 1500 })
win.loadURL('http://github.com')
let contents = win.webContents
console.log(contents)
4、skech与webview的通信
1)Sending a message to the WebView from your plugin command
On the WebView:
window.someGlobalFunctionDefinedInTheWebview = function(arg) {
  console.log(arg)
}
On the plugin:
插件启动向WebView发送数据:
browserWindow.webContents
  .executeJavaScript('someGlobalFunctionDefinedInTheWebview("hello")')
  .then(res => {
    // do something with the result
  })
动态向WebView发送数据:
import {getWebview, isWebviewPresent, sendToWebview} from 'sketch-module-web-view/remote';
var existingWebview = getWebview(identifier);
if (isWebviewPresent(existingWebview.id)){
 sendToWebview (existingWebview.id , `someGlobalFunctionDefinedInTheWebview(${sentData})` )
}
2)Sending a message to the plugin from the WebView
On the plugin:
var sketch = require('sketch')
browserWindow.webContents.on('nativeLog', function(s) {
  sketch.UI.message(s)
})
On the webview:
window.postMessage('nativeLog', 'Called from the webview')
// you can pass any argument that can be stringified
window.postMessage('nativeLog', {
  a: b,
})
// you can also pass multiple arguments
window.postMessage('nativeLog', 1, 2, 3)
六、构建开发工程
1、确立技术栈
使用Sketch webView的方式开发插件。用户通过操作插件界面,webview与Sketch通信解决用户的问题。这样插件界面可以使用现今所有的前端框架与组件库。
1)webView框架选择Umi + Ant Design
注:WebView框架也可以单独的工程与部署。
2)使用Sketch 官方skpm插件工程
3)调试工具
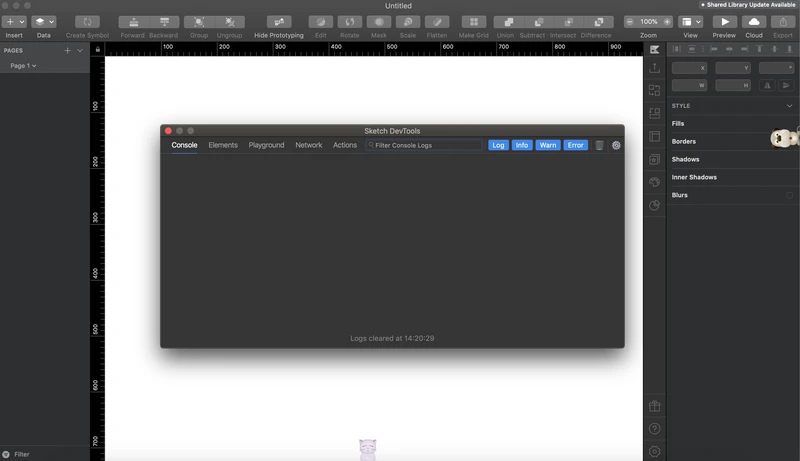
A、使用官方的sketch-dev-tools sketch内作为调试工具
下载代码,代码运行安装插件即可:
npm install
npm run build
调试界面如下:
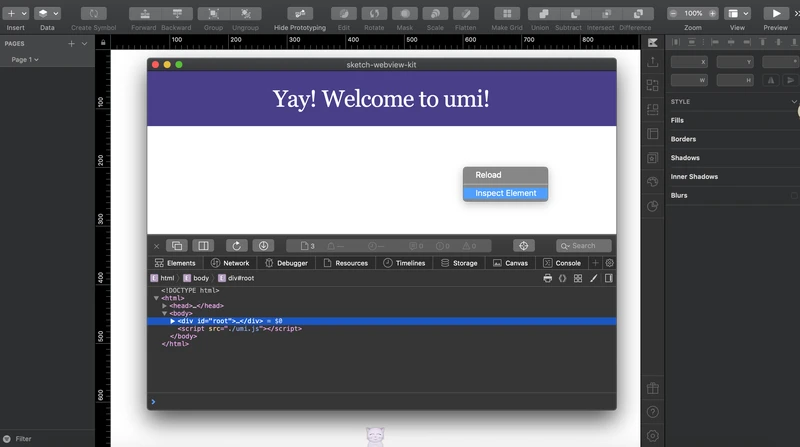
B、使用浏览器的开发者模式调试webView。
在sketch webView中右击显示调试器即可:
4)服务端技术方案
轻量级服务器部署方案 -(阿里云CenOS+宝塔)
2、构建工程
1)创建Sketch插件基础工程
首先,创建sketch-webview-kit插件工程:
npm install -g skpm
skpm create sketch-webview-kit //创建sketch-webview-kit插件工程
其次,依赖sketch-module-web-view:
npm install sketch-module-web-view2)创建webView工程(Umi + Ant Design)
首先,创建webView工程目录,
$ mkdir webapp && cd webapp然后,创建webView工程
yarn create umi依次:
选择 app, 然后回车确认;
选上 antd 和 dva,然后回车确认;
最后,安装依赖:
$ yarn3)配置webView工程
A.部署打包配置
.umirc.js文件中,添加:
outputPath:'../src/dist', //打包后的目录
exportStatic: {
  htmlSuffix: true,
 dynamicRoot: true //静态自由部署
},
B.HTML 模板
由于Umi生成没有Html文件,可以自己配置。新建 src/pages/document.ejs,umi 约定如果这个文件存在,会作为默认模板,内容上需要保证有 <div id="root"></div>,比如:
<!doctype html>
<html>
<head>
  <meta charset="utf-8" />
  <title>Your App</title>
</head>
<body>
  <div id="root"></div>
</body>
</html>
C.添加新页面
直接在pages文件夹下建立页面的js与css样式文件即可。
D.《基于 umi 的 React 项目结构介绍》
3、sketch加载webView工程与联调
1)sketch加载webView
第一种方法:
直接部署webView工程,通过Url加载:
win.loadURL('https://github.com')第二种方法:
加载webView工程打包后的文件:
win.loadURL(require('./dist/index.html'))注意:
此方法,由umi打包后的静态资源(css、js)需要拷贝到
pannel3/pannel3.sketchplugin/Contents/Resources/_webpack_resources下。
2)联调加载方法:
本地启动webView工程,本地webView工程会在8000端口起一个服务,加载此服务即可:
const Panel = `http://localhost:8000#${Math.random()}`;
win.loadURL(Panel)
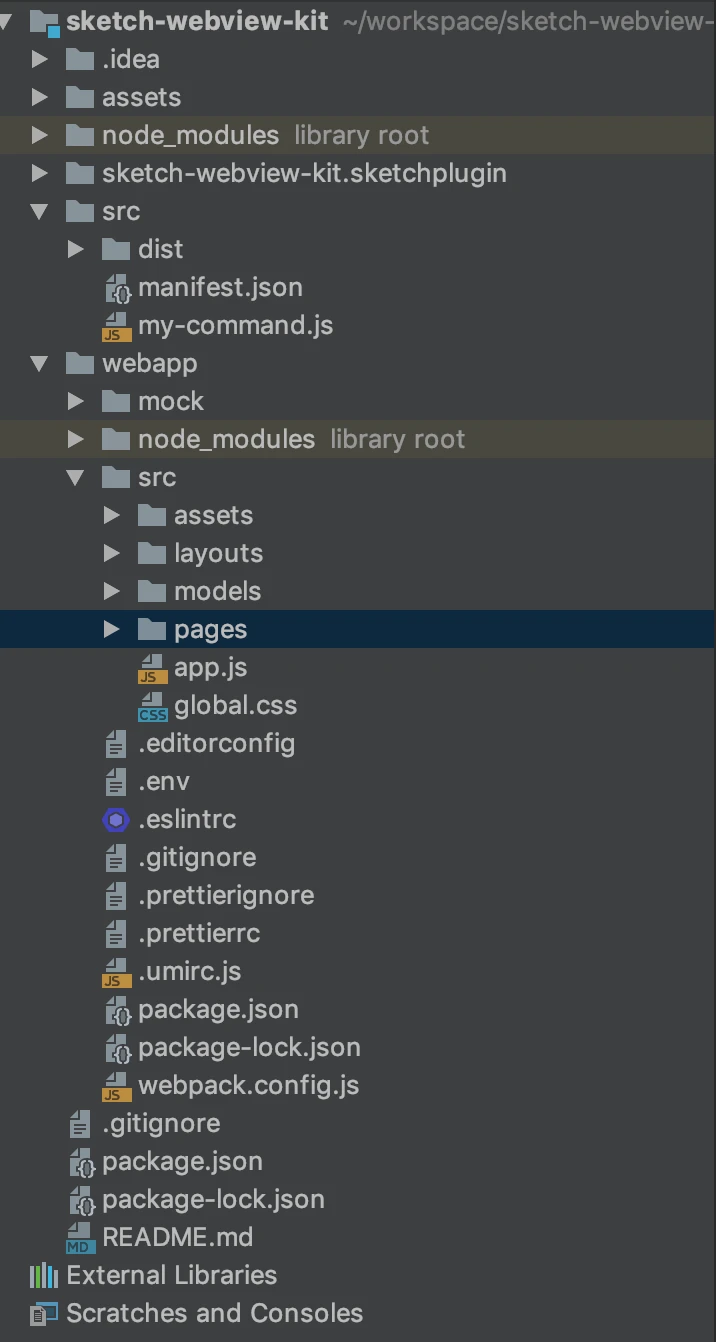
4、项目成果
文件目录如下:
七、发布sketch 插件
前提确保manifest.json的version参数已经修改为想要发布的版本。
{
  "name": "Whale Kit",
  "identifier": "whale-sketch-webview-kit",
  "description": "A quick prototype tool library for sketch. ",
  "author": "jingwhale",
  "authorEmail": "jingwhale@yeah.net",
  "compatibleVersion": 3,
  "bundleVersion": 1,
  "icon": "icon.png",
  "version": "0.4.3",
  "commands": [
    {
      "name": "Efficient design spec",
      "identifier": "sketch-webview-kit.my-command",
      "script": "whaleHomepage.js"
    },
    {
      "name": "Make Layout",
      "identifier": "sketch-webview-kit.my-command2",
      "script": "makeLayoutCommand.js",
      "shortcut" : "shift control a"
    },
    {
      "name": "Generate Button",
      "identifier": "sketch-webview-kit.my-command3",
      "script": "generateButtonCommand.js",
      "shortcut" : "shift control z"
    },
    {
      "name": "Operate Image",
      "identifier": "sketch-webview-kit.my-command4",
      "script": "operateImageCommand.js",
      "shortcut" : "shift control q"
    },
    {
      "name": "Flow Page",
      "identifier": "sketch-webview-kit.my-command5",
      "script": "flowPageCommand.js",
      "shortcut" : "control option shift p"
    },
    {
      "name": "Screen Shot",
      "identifier": "sketch-webview-kit.my-command6",
      "script": "screenshotCommand.js",
      "shortcut" : "control option shift j"
    },
    {
      "name": "Toggle State",
      "identifier": "sketch-webview-kit.my-command7",
      "script": "toggleStateCommand.js",
      "handler" : "onRun",
      "shortcut" : "control option shift k"
    },
    {
      "name": "Convert to Grayscale",
      "identifier": "sketch-webview-kit.my-command8",
      "script": "convertToGrayscaleCommand.js",
      "handler" : "onRun",
      "shortcut" : "control option shift g"
    },
    {
      "name": "Generate QR Code",
      "shortcut": "ctrl shift option q",
      "identifier": "sketch-webview-kit.my-command9",
      "script": "generateQrcode.js",
      "handler" : "onRun"
    },
    {
      "name": "Generate Cover",
      "shortcut": "ctrl shift option c",
      "identifier": "sketch-webview-kit.my-command10",
      "script": "generateCover.js",
      "handler" : "onRun"
    },
    {
      "name": "Generate Radar Chart",
      "shortcut": "ctrl shift option f",
      "identifier": "sketch-webview-kit.my-command11",
      "script": "generateRadarChart.js",
      "handler" : "onRun"
    },
    {
      "name": "Generate Tags",
      "shortcut": "ctrl shift option t",
      "identifier": "sketch-webview-kit.my-command12",
      "script": "generateTags.js",
      "handler" : "onRun"
    },
    {
      "name": "Generate Signifiers",
      "shortcut": "ctrl shift option s",
      "identifier": "sketch-webview-kit.my-command13",
      "script": "generateSignifiers.js",
      "handler" : "onRun"
    }
  ],
  "menu": {
    "title": "Whale Kit",
    "items": [
      "sketch-webview-kit.my-command",
      "-",
      "sketch-webview-kit.my-command2",
      "sketch-webview-kit.my-command3",
      "sketch-webview-kit.my-command4",
      "sketch-webview-kit.my-command7",
      "-",
      "sketch-webview-kit.my-command12",
      "sketch-webview-kit.my-command13",
      "-",
      "sketch-webview-kit.my-command6",
      "sketch-webview-kit.my-command8",
      "sketch-webview-kit.my-command9",
      "-",
      "sketch-webview-kit.my-command5",
      "sketch-webview-kit.my-command10"
    ]
  }
}首先,需要把你的插件代码放到 Github仓库;
其次,使用开通GitHub Token;
因为,skpm需要一个GitHub令牌才能发布版本,需要`repo`权限才能创建版本。
设置完后,使用命令:
skpm login将GitHub Token填进去,回车即可。
最后,使用命令,等待发布完成即可:
skpm publish <bump>bump为patch, minor, or major其中之一,分别表示补丁,小改,大改
若是patch,变为1.0.1
若是minor,变为1.1.0
若是major,变为2.0.0
一旦你的插件被发布,它就会在sketch进行新的部署时出现在sketch插件官网上(可能需要几分钟到几天),部署成功后,可以在sketch插件官网查看发布的插件。
八、拓展
1、React - SketchApp
是一个开源库,为设计系统量身定制。它通过将 React 元素渲染到 Sketch 来连接设计和开发之间的鸿沟。
Sketch Javascript API 是源生代码,React - SketchApp 使用react对Javascript API 进行了二次封装。
1)API
API Reference · react-sketchapp
2)自研JINGWHALE Sketch 插件
https://www.jingwhale.com/sketch/index.html

